INSTALLATION

- Download your Soulmate Presets from your email or account on the website and save the .zip file to your desktop.
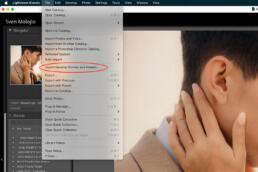
- Open Lightroom Classic
- Click "File" in the top menu.
- Select Import Develop Profiles and Presets in the dropdown menu.
- Chose the zip file you just saved.
- Done.

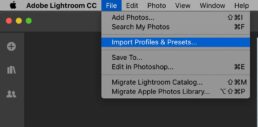
- Download your Soulmate Presets from your email or account on the website, save the .zip file to your desktop and unzip the file.
- Open Lightroom CC. Select any photo.
- go to File > Import Profiles & Presets.
- Chose the zip file you just saved.
- Done.

1. Download your Soulmate Presets from your email or account on the website and save the .zip file to your desktop.
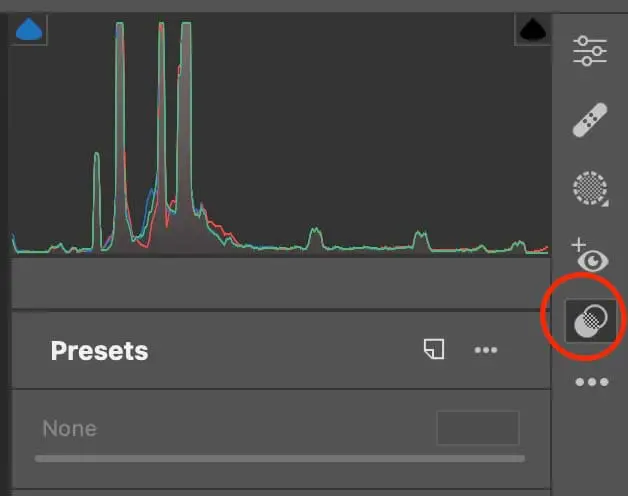
2. Open Photoshop and open the camera raw filter under: Filter >>> Camera Raw Filter.
3. Go to the presets tab:
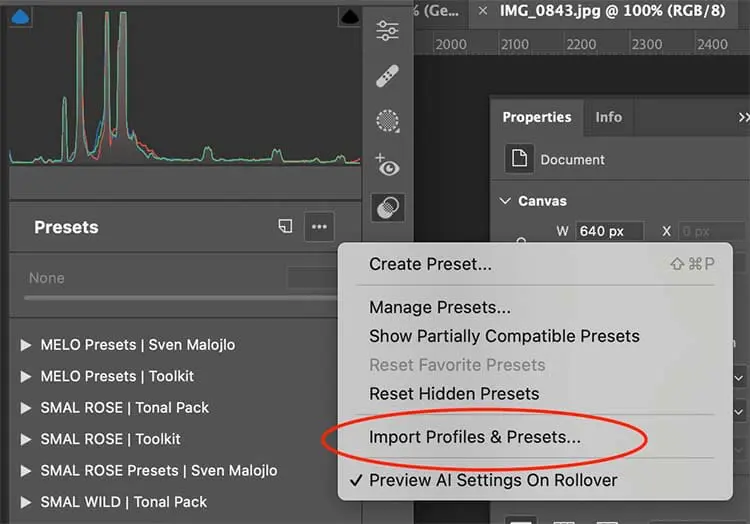
4. Click the three dotted menu circled in the screenshot and select “Import Profiles & Presets”. Now select the zip file you saved to your desktop.
Important note: Since ACR 16.0 the files have to be zipped to be installed.
5. Done!
1. Download your Soulmate Presets from your email or account on the website and save the .zip file to your desktop.
2. Unzip all files.
3. Open Photoshop and open the camera raw filter under: Filter >>> Camera Raw Filter.
4. Go to the presets tab:
5. Click the three dotted menu circled in the screenshot and select “Import Profiles & Presets”. Now select the -xmp files from the unzipped folder on your desktop.
6. Done!
- Download your Soulmate Presets from your email or account on the website, save the .zip file to your desktop and unzip the files.
- Copy the .XMP files into one of these locations depeding on your system:
- Macintosh: / Library / Application Support / Adobe / CameraRaw / Settings
- Windows: C:\ ProgramData \ Adobe \ CameraRaw \ Settings
- Windows Alternative: C:\Users\[User Name]\AppData\Roaming\Adobe\CameraRaw\Settings
- to access them within Photoshop open up Camera Raw and click the little icon as shown on the screenshot.
- Done.

- Download your Soulmate Presets from your email or account on the website, save the .zip file to your desktop and unzip the files.
- On a PC click "Edit > Preferences". On a Mac click "Lightroom > Preferences".
- On the window that now opened click the second tab called Presets.
- For LR 4,5 & 6 click on "Show Lightroom Presets Folder". For Lr Classic 7.2 and earlier click on "Show all other Lightroom Presets".
- Double click on the folder "Lightroom".
- Double click on the folder "Develop Presets".
- Copy the unzipped presets into the develop presets folder.
- Restart Lightroom. Done.
- Open Lightroom and go to Preferences:
- On PC, click "Edit" at the top (next to File), then select "Preferences" in the menu.
- On Mac, click "Lightroom" at the top (left of File), then choose "Preferences."
- Select the Presets Tab:
- In the Preferences window that appears, click the "Presets" tab (the second tab).
- Enable Lightroom Presets:
- Click the button that says "Show All Other Lightroom Presets" for newer Lightroom versions.
- For older Lightroom versions, click "Show Lightroom Presets Folder."
- Open the Lightroom Folder:
- A new window will open; double-click the "Lightroom" folder.
- Access Local Adjustment Presets:
- Next, double-click the "Local Adjustment Presets" folder.
- Copy and Paste Brushes:
- Now, copy the Lightroom Brushes (.lrtemplate file) from where you downloaded them on your computer.
- Paste them into the "Local Adjustment Presets" folder.
- Restart Lightroom:
- If Lightroom was open when you copied the Brushes, close it, and then reopen it.
- You're finished!
1. Go into the Develop Module.
2. Go to the masking section. To enter it click the dotted circle icon:
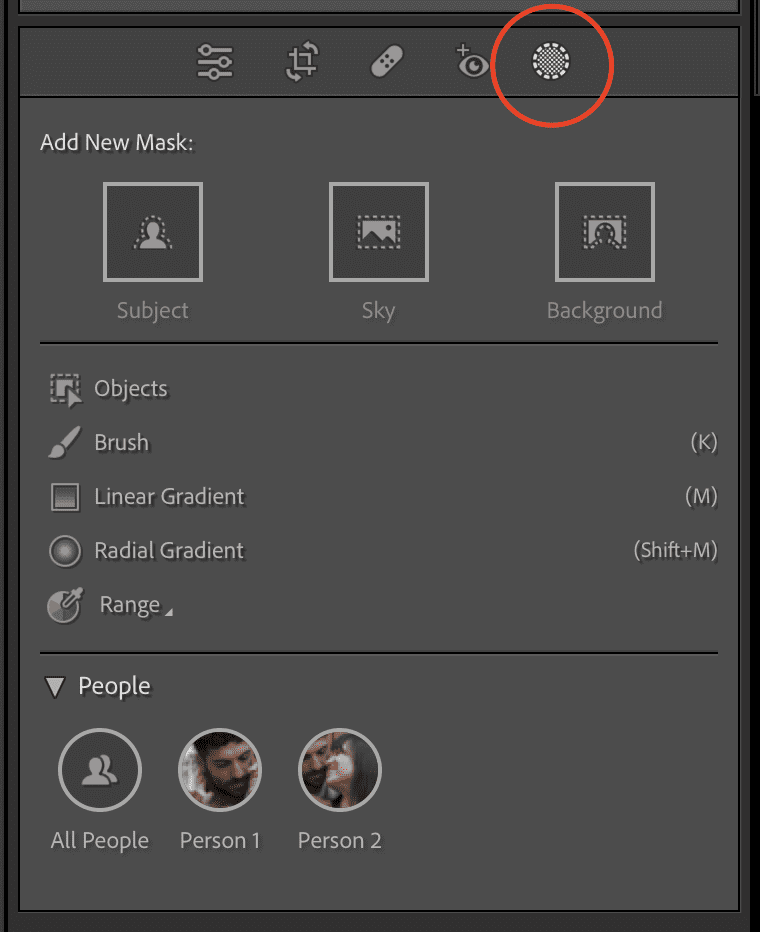
3. Now select any of the masks or local adjustments.
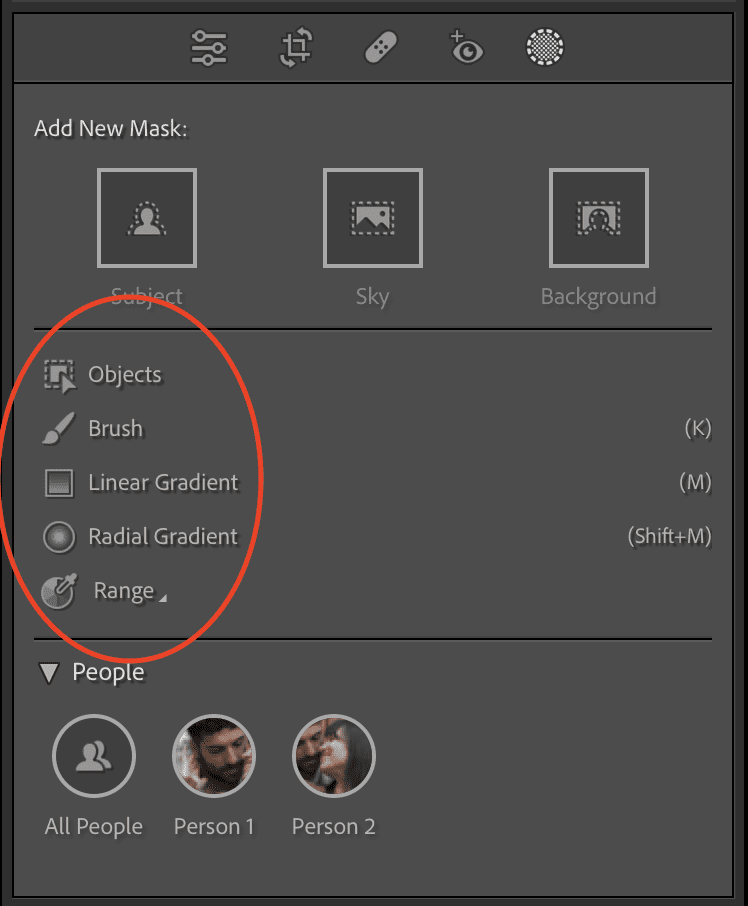
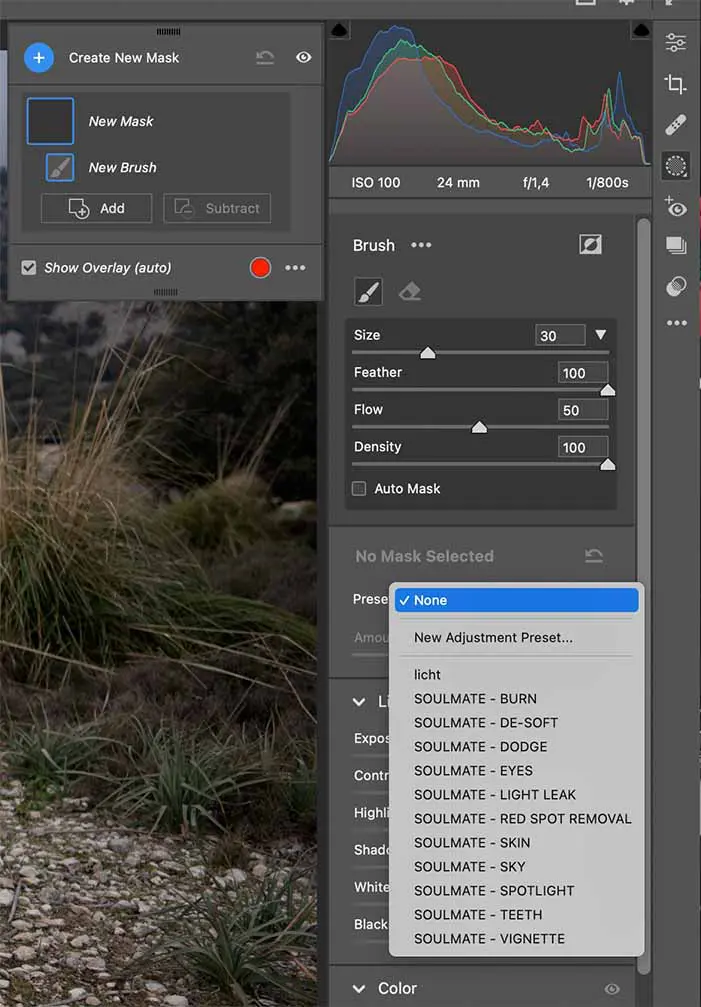
4. You can now choose your desired brush (local adjustment preset) from the dropdown menu by clicking on the name.
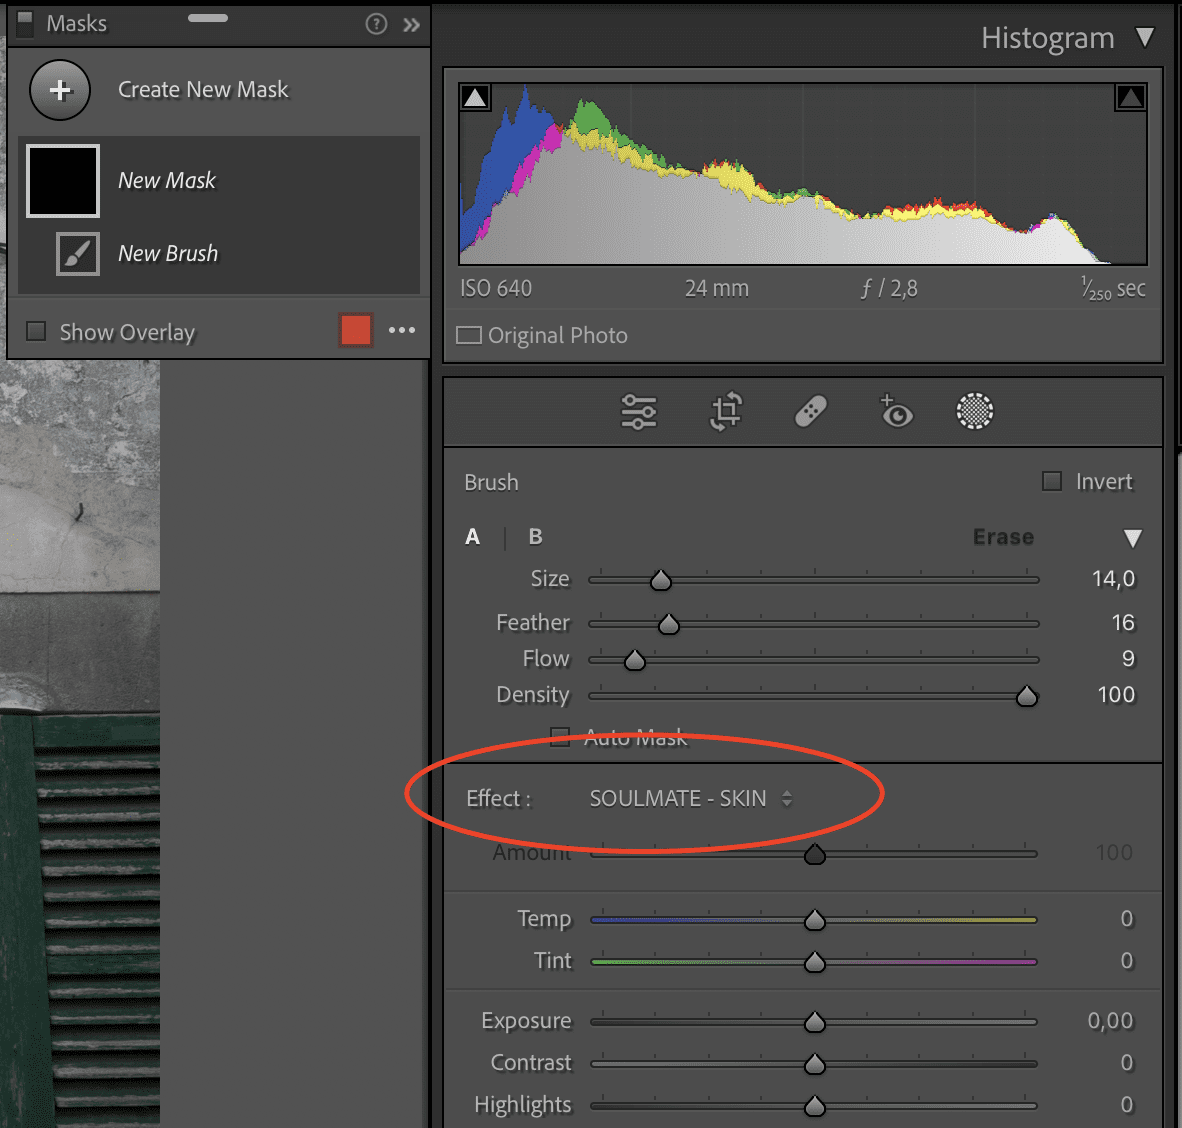
5. Done!
- Open the zip file.
- Save the ACR brushes in a place on your computer where you can easily find them.
- Copy the .xmp files from the ACR folder to one of these locations on your computer:
- For Mac (make sure to show hidden files):
- Macintosh: /Users/UserName/Library/Application Support/Adobe/CameraRawFolder/LocalCorrections
- For Windows:
- Windows XP: C:\Documents and Settings\UserName\Application Data\Adobe\CameraRaw\LocalCorrections
- Windows 7 & 10: C:\Users\UserName\AppData\Roaming\Adobe\CameraRaw\LocalCorrections
- For Mac (make sure to show hidden files):
- Done! Your ACR brushes are now in place and ready to use.
1. Go into the Develop Module.
2. Go to the masking section. To enter it click the dotted circle icon:
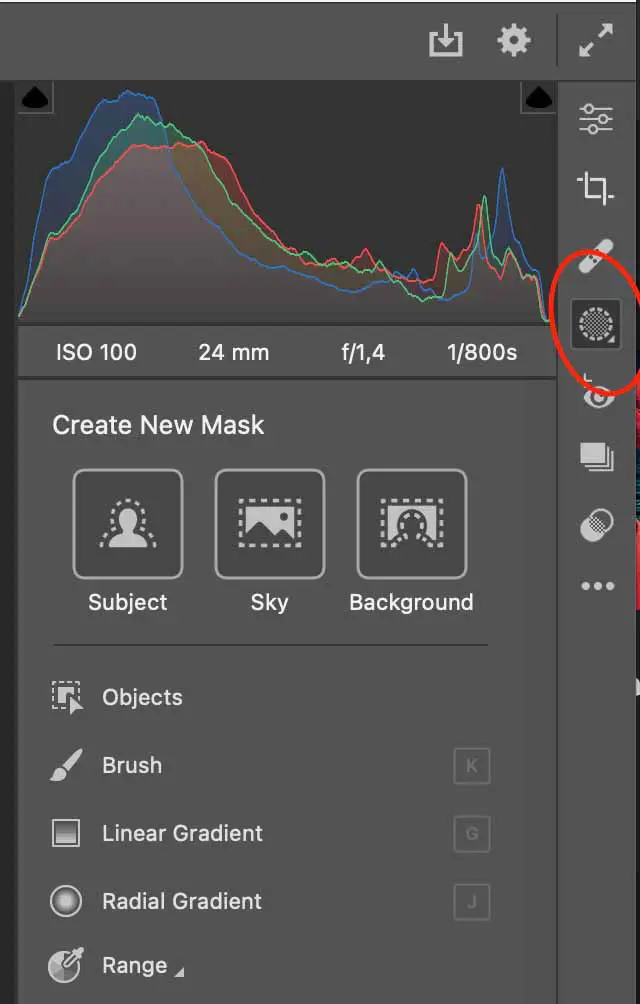 3. Now select any of the masks or local adjustments.
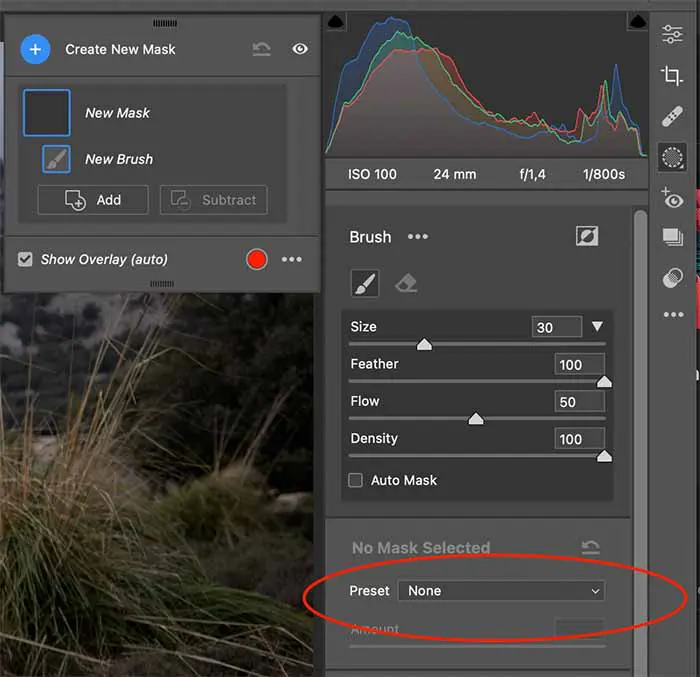
 4. You can now choose your desired brush (local adjustment preset) from the dropdown menu by clicking on the name.
5. Done!
INSTALL PRESETS & AI MASKS IN LR & ACR
- Download your Soulmate Presets from your email or account on the website and save the .zip file to your desktop.
- Open Lightroom Classic
- Click "File" in the top menu.
- Select Import Develop Profiles and Presets in the dropdown menu.
- Chose the zip file you just saved.
- Done.
- Download your Soulmate Presets from your email or account on the website, save the .zip file to your desktop and unzip the file.
- Open Lightroom CC. Select any photo.
- go to File > Import Profiles & Presets.
- Chose the zip file you just saved.
- Done.
1. Download your Soulmate Presets from your email or account on the website and save the .zip file to your desktop.
2. Open Photoshop and open the camera raw filter under: Filter >>> Camera Raw Filter.
3. Go to the presets tab:
4. Click the three dotted menu circled in the screenshot and select “Import Profiles & Presets”. Now select the zip file you saved to your desktop.
Important note: Since ACR 16.0 the files have to be zipped to be installed.
5. Done!
1. Download your Soulmate Presets from your email or account on the website and save the .zip file to your desktop.
2. Unzip all files.
3. Open Photoshop and open the camera raw filter under: Filter >>> Camera Raw Filter.
4. Go to the presets tab:
5. Click the three dotted menu circled in the screenshot and select “Import Profiles & Presets”. Now select the -xmp files from the unzipped folder on your desktop.
6. Done!
- Download your Soulmate Presets from your email or account on the website, save the .zip file to your desktop and unzip the files.
- Copy the .XMP files into one of these locations depeding on your system:
- Macintosh: / Library / Application Support / Adobe / CameraRaw / Settings
- Windows: C:\ ProgramData \ Adobe \ CameraRaw \ Settings
- Windows Alternative: C:\Users\[User Name]\AppData\Roaming\Adobe\CameraRaw\Settings
- to access them within Photoshop open up Camera Raw and click the little icon as shown on the screenshot.
- Done.
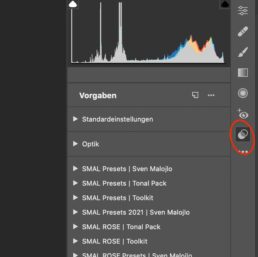
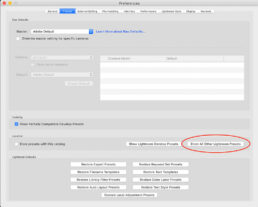
- Download your Soulmate Presets from your email or account on the website, save the .zip file to your desktop and unzip the files.
- On a PC click "Edit > Preferences". On a Mac click "Lightroom > Preferences".
- On the window that now opened click the second tab called Presets.
- For LR 4,5 & 6 click on "Show Lightroom Presets Folder". For Lr Classic 7.2 and earlier click on "Show all other Lightroom Presets".
- Double click on the folder "Lightroom".
- Double click on the folder "Develop Presets".
- Copy the unzipped presets into the develop presets folder.
- Restart Lightroom. Done.
INSTALL BRUSHES IN LR & ACR
- Open Lightroom and go to Preferences:
- On PC, click "Edit" at the top (next to File), then select "Preferences" in the menu.
- On Mac, click "Lightroom" at the top (left of File), then choose "Preferences."
- Select the Presets Tab:
- In the Preferences window that appears, click the "Presets" tab (the second tab).
- Enable Lightroom Presets:
- Click the button that says "Show All Other Lightroom Presets" for newer Lightroom versions.
- For older Lightroom versions, click "Show Lightroom Presets Folder."
- Open the Lightroom Folder:
- A new window will open; double-click the "Lightroom" folder.
- Access Local Adjustment Presets:
- Next, double-click the "Local Adjustment Presets" folder.
- Copy and Paste Brushes:
- Now, copy the Lightroom Brushes (.lrtemplate file) from where you downloaded them on your computer.
- Paste them into the "Local Adjustment Presets" folder.
- Restart Lightroom:
- If Lightroom was open when you copied the Brushes, close it, and then reopen it.
- You're finished!
1. Go into the Develop Module.
2. Go to the masking section. To enter it click the dotted circle icon:
3. Now select any of the masks or local adjustments.
4. You can now choose your desired brush (local adjustment preset) from the dropdown menu by clicking on the name.
5. Done!
- Open the zip file.
- Save the ACR brushes in a place on your computer where you can easily find them.
- Copy the .xmp files from the ACR folder to one of these locations on your computer:
- For Mac (make sure to show hidden files):
- Macintosh: /Users/UserName/Library/Application Support/Adobe/CameraRawFolder/LocalCorrections
- For Windows:
- Windows XP: C:\Documents and Settings\UserName\Application Data\Adobe\CameraRaw\LocalCorrections
- Windows 7 & 10: C:\Users\UserName\AppData\Roaming\Adobe\CameraRaw\LocalCorrections
- For Mac (make sure to show hidden files):
- Done! Your ACR brushes are now in place and ready to use.
1. Go into the Develop Module.
2. Go to the masking section. To enter it click the dotted circle icon:
3. Now select any of the masks or local adjustments.
4. You can now choose your desired brush (local adjustment preset) from the dropdown menu by clicking on the name.
5. Done!
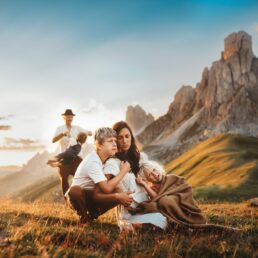
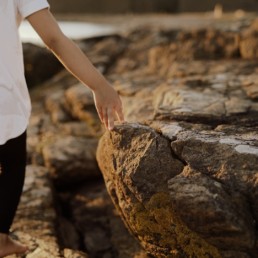
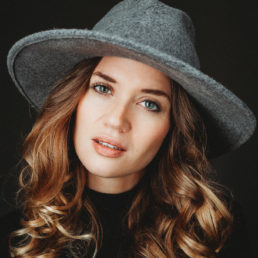
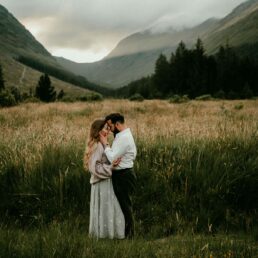
Presets
Our Lightroom & ACR Presets will give you beautiful tones, flawless skintones and consistency. We strive for a creative touch, while creating timeless edits, that last forever. They are tested on 2500+ raw files from all major brand cameras like Canon, Nikon, Leica, Sony, Fuji and Pentax. They will help you cut down your editing time.
We finally also developed LUTs for video editing to give you the ability to achieve a cohesive portfolio with ease.


FACEBOOK GROUP
Join our FREE Facebook Community full of kind and uplifting Creatives.
In our Community you´ll get free Education, Tips and Tricks around the use of our Presets. You can see Live Edits and attend Q&As. We also share the newest Releases and Informations in there. We talk about all things Photography and everyone is welcome. From beginners to professionals we all root for each other and help each other wherever we can!